Using the API to add data to Webflow & syndicating it across multiple sites
Process Street/Form + Zapier/Make
With this solution, you could set things up quickly without a lot of engineering resources, but this solution could be brittle and not sustainable long-term.
Data intake: form setup
To optimize your form, you need to modify a few things. Many questions will work well for this process and the API, but a few adjustments will improve the process.
Instead of having customers upload all images to a Google Drive folder, create individual fields for each image. This allows them to select the preferred image for display. Optionally, you can still request an entire folder for future customization, but field specification is necessary for the automation process during onboarding.
You might need to switch form providers as well. Process Street is a great tool and it uses webhooks to send events once a record is created, but for our solution to work, we also need to assign a unique URL to the form. Custom code can help retrieve a value from this URL to add to the form and custom code is something Process Street doesn’t support.
When a customer signs with you, you'll have to create the Webflow site manually due to the lack of a Create Site endpoint. Ideally, the form URL sent to customers should have a unique parameter. For instance, if your onboarding form is at onboarding.domain.com, a parameter with an ID should be added to indicate the site where items will be placed, like this:
onboarding.domain.com?id=60359921321f8d5992691da6
This links the form submission to the correct site. A hidden field on the form can be used to store the ID. Custom code can then extract this ID and place it in the relevant field. Here’s some sample code:
const queryString = window.location.search;
const urlParams = new URLSearchParams(queryString);
let siteId = urlParams.get("id");
document.querySelector("#hiddenID").value = siteId;
Since you have to create the site before the user onboards, you may want to make choosing a template a part of the signup/sales process vs. the onboarding process.
Zapier/Make backend
Once the form is filled out, the data will be sent to the automation tool of your choice. From here, you have a happy path with a wonderful UI to get content into your site.
The Zap or Scenario in those tools would look like this:
- Receive the payload from the form submission
- Use the ID of from the hidden field to get the right site and collections
- Use the GUI interface to to work through the data submitted and create new items in the Webflow CMS
Final process for your team and the customer:
- Customer signs up with you
- your team creates a site
- Customer fills out the onboarding form
- Zapier/Make receive the data
- You can transform this data any way you want with what’s available
- Zapier/Make create the CMS items in the site
- your team makes any tweaks and necessary changes
- Publish the site
This should reduce the time to build and launch the site and make life easier for all involved in the process.
Process Street/Form + Node.js + Webflow API
With this solution, you would need developer time and resources, but this is a solid and scalable solution to help move content from your onboarding form to the Webflow CMS. Some pieces of this solution would mirror the solution above, but this would be a more stable/scalable solution.
Form setup
To optimize your form, you need to modify a few things. Many questions will work well for this process and the API, but a few adjustments will improve the process.
Instead of having customers upload all images to a Google Drive folder, create individual fields for each image. This allows them to select the preferred image for display. Optionally, you can still request an entire folder for future customization, but field specification is necessary for the automation process during onboarding.
You might need to switch form providers as well. Process Street is a great tool and it uses webhooks to send events once a record is created, but for our solution to work, we also need to assign a unique URL to the form. Custom code can help retrieve a value from this URL to add to the form and custom code is something Process Street doesn’t support.
When a customer signs with your team, you'll have to create the Webflow site manually due to the lack of a Create Site endpoint. Ideally, the form URL sent to customers should have a unique parameter. For instance, if your onboarding form is at onboarding.domain.com, a parameter with an ID should be added to indicate the site where items will be placed, like this:
onboarding.domain.com?id=60359921321f8d5992691da6
This links the form submission to the correct site. A hidden field on the form can be used to store the ID. Custom code can then extract this ID and place it in the relevant field. Here’s some sample code:
const queryString = window.location.search;
const urlParams = new URLSearchParams(queryString);
let siteId = urlParams.get("id");
document.querySelector("#hiddenID").value = siteId;
Since you have to create the site before the user onboards, you may want to make choosing a template a part of the signup/sales process vs. the onboarding process.
Node.js backend
With this solution, you would create your own simple node.js backend. Your developers could follow this recommended path and then you would need to deploy this to your own infrastructure.
Catch the data from the form submission
First you would need to have an endpoint listening to your form for any new submissions. On submission you can take advantage of the Webflow npm package to interact with your newly created Webflow site.
Transform the data and send it to Webflow
An overview of what would happen when the data is processed:
- Your node server receives the data
- It uses the unique ID to get the relevant site and collection IDs
- You can use code to transform the data any way you want
- A good example, check the images that are uploaded
- If they’re above a certain size, resize the image
- Use an API to compress the image, etc.
- Once the data is ready for the Webflow CMS, use the Webflow API to create the item(s), here’s some sample code:
// import neccessary packages
import Webflow from "webflow-api";
import Bottleneck from "bottleneck";
import * as dotenv from "dotenv";
dotenv.config();

// set up api task scheduler to respect Webflow api rate limit of 300
const limiter = new Bottleneck({
  maxConcurrent: 1,
  minTime: 200,
});

// form data being passed to the Webflow api
yourFields = {
  fields: {
    slug: "new-item",
    name: "My New Item",
    _archived: false,
    _draft: false,
  },
};

// create connection to the Webflow api using our Webflow api token
const webflowApi = new Webflow({ token: process.env.WF_API_KEY });

// function to call the Webflow api to create each movie
async function createItem(item) {
  // make the call to Webflow to add the items
  return webflowApi
    .createItem({
      collectionId: "6353176f2cf2501b7755dae3",
      fields: yourFields,
    })
    .then((res) => console.log(res.name))
    .catch((err) => console.log(err));
}
In the above example we’re using the Webflow npm package, Bottleneck to control rate limits, and environment variables to hide our API keys. Then we’re taking the fields passed by the form and using the Webflow API to create the item(s).
From here, your team can make any necessary changes in the Webflow project and Publish.
This approach would require engineering resources and maintenance, but long-term it would be easier to maintain and to make changes to. Zapier/Make can be quick to set up, but if you need to make larger changes it can be cumbersome to get all the details right.
Additionally, with this setup you don’t have to worry as much about an application outage since you control your infrastructure.
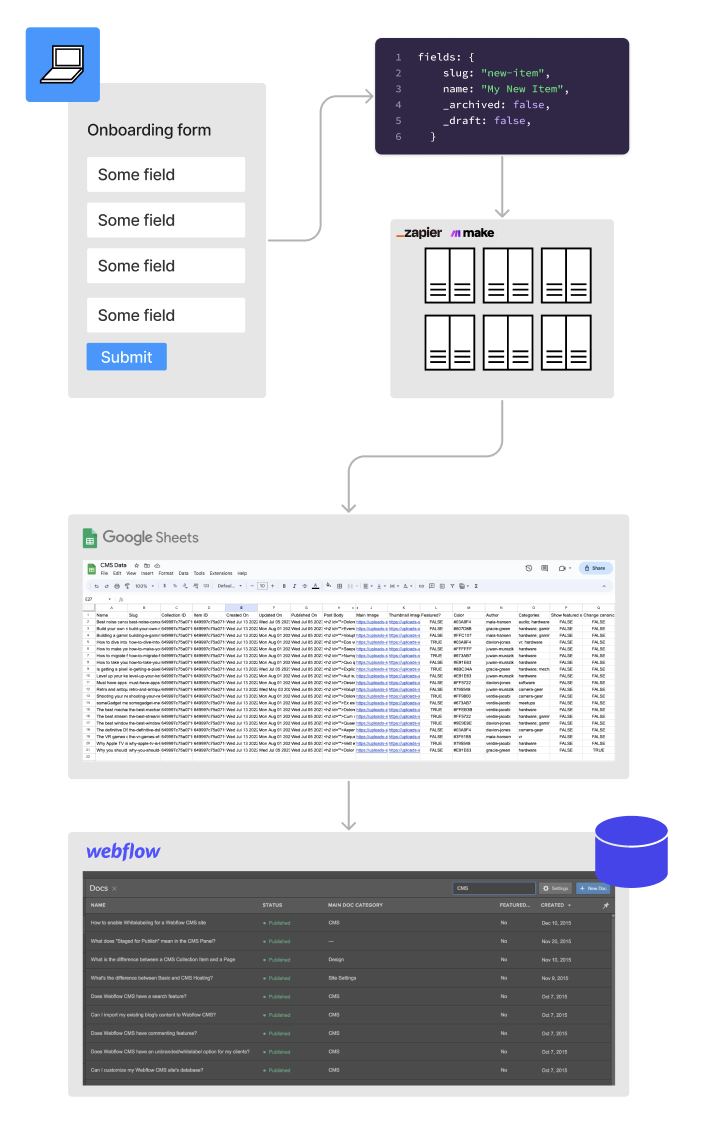
Process Street/Form + Zapier/Make + CSV
With this solution, you could set things up quickly without a lot of engineering resources, but this solution could be brittle and not sustainable long-term.
Form setup
To optimize your form, you need to modify a few things. Many questions will work well for this process and the API, but a few adjustments will improve the process.
Instead of having customers upload all images to a Google Drive folder, create individual fields for each image. This allows them to select the preferred image for display. Optionally, you can still request an entire folder for future customization, but field specification is necessary for the automation process during onboarding.
With this approach, you can keep using Process Street and you won’t have to worry about switching providers.
Zapier/Make + CSV
Once the data is submitted, use automation tools to create a new Google Sheet and to place the data in the appropriate rows and columns so that once created you can export the sheet as a CSV and then import into the appropriate Webflow site.
This is a more manual approach, but is easy to set up, lightweight and lets you keep your current form provider.
Potential solutions for updating SEO
Node.js + Database + API/Webflow npm package
With this solution, you would need some engineering resources, but this would set you up to programmatically make SEO changes across hundreds of sites quickly and easily.
Node.js
Create a node.js script that can be run locally on a user's machine, no infrastructure required. This script will get new content from a database of your choice, or you can update a portion of your script.
Database
The database doesn’t have to be very heavy/fancy – you can use something simple like Airtable since it has an API.
API
When run, the node.js script would get the new SEO content that needs to be shipped, then use the new endpoints coming with APIv2 in Webflow to get a list of pages. It can then iterate through those pages and place in the new copy using the company names and key words in the database to make it dynamic and unique for each site.
We can take the same approach as our earlier example and use the Bottleneck npm package to make sure we’re staying within Webflow’s rate limits.
With this approach a user can note any SEO changes, ensure the database is up to date with current sites and variables (customer name, etc.) and then run something like npm run seo in the CLI and the node script will update all the sites programmatically.
Webflow + custom JavaScript
With this approach you would need some engineering resources, but once the code is written, updating the content in one file updates it across hundreds of sites.
JavaScript
With this approach you would give each site a set of locally scoped variables. For example:
const companyName = "My Fitness Company";
const companyFocus = "Crossfit";
const companyProds = "Yoga, Weightlifting, Hit";
Then you can have an external JS file that you host outside of Webflow that holds the majority of the SEO content and it creates all SEO data on page load. A sample could look like this:
document.addEventListener("DOMContentLoaded", function () {
  // Set the title
  const title = `${companyName}: Leading provider of ${companyFocus} training`;
  document.title = title;

  // Set the meta description
  const description = `${companyName} specializes in ${companyFocus}. We offer a variety of fitness activities including ${companyProds}. Join us today and achieve your fitness goals!`;
  const metaDescription = document.createElement("meta");
  metaDescription.name = "description";
  metaDescription.content = description;
  document.getElementsByTagName("head")[0].appendChild(metaDescription);

  // Set the meta keywords
  const keywords = `${companyName}, ${companyFocus}, ${companyProds}`;
  const metaKeywords = document.createElement("meta");
  metaKeywords.name = "keywords";
  metaKeywords.content = keywords;
  document.getElementsByTagName("head")[0].appendChild(metaKeywords);

  // Set the OG tags
  const ogTitle = document.createElement("meta");
  ogTitle.setAttribute("property", "og:title");
  ogTitle.content = title;
  document.getElementsByTagName("head")[0].appendChild(ogTitle);

  const ogDescription = document.createElement("meta");
  ogDescription.setAttribute("property", "og:description");
  ogDescription.content = description;
  document.getElementsByTagName("head")[0].appendChild(ogDescription);

  // And any other SEO-related tags you need
  // ...
});
There is a downside here as the preferred way would be to have this rendered server-side, but Google, Bing, etc do run JavaScript before crawling a page and should see this content.
This means you can keep company name, key words, focus, etc. locally in the Webflow project and make sweeping changes in the global file that creates all these tags.
Disclaimer
All code shared in this playbook is not complete and shared under an MIT License.
Permission is hereby granted, free of charge, to any person obtaining a copy of this software and associated documentation files (the “Software”), to deal in the Software without restriction, including without limitation the rights to use, copy, modify, merge, publish, distribute, sublicense, and/or sell copies of the Software, and to permit persons to whom the Software is furnished to do so, subject to the following conditions:
The above copyright notice and this permission notice shall be included in all copies or substantial portions of the Software.
THE SOFTWARE IS PROVIDED “AS IS”, WITHOUT WARRANTY OF ANY KIND, EXPRESS OR IMPLIED, INCLUDING BUT NOT LIMITED TO THE WARRANTIES OF MERCHANTABILITY, FITNESS FOR A PARTICULAR PURPOSE AND NONINFRINGEMENT. IN NO EVENT SHALL THE AUTHORS OR COPYRIGHT HOLDERS BE LIABLE FOR ANY CLAIM, DAMAGES OR OTHER LIABILITY, WHETHER IN AN ACTION OF CONTRACT, TORT OR OTHERWISE, ARISING FROM, OUT OF OR IN CONNECTION WITH THE SOFTWARE OR THE USE OR OTHER DEALINGS IN THE SOFTWARE.